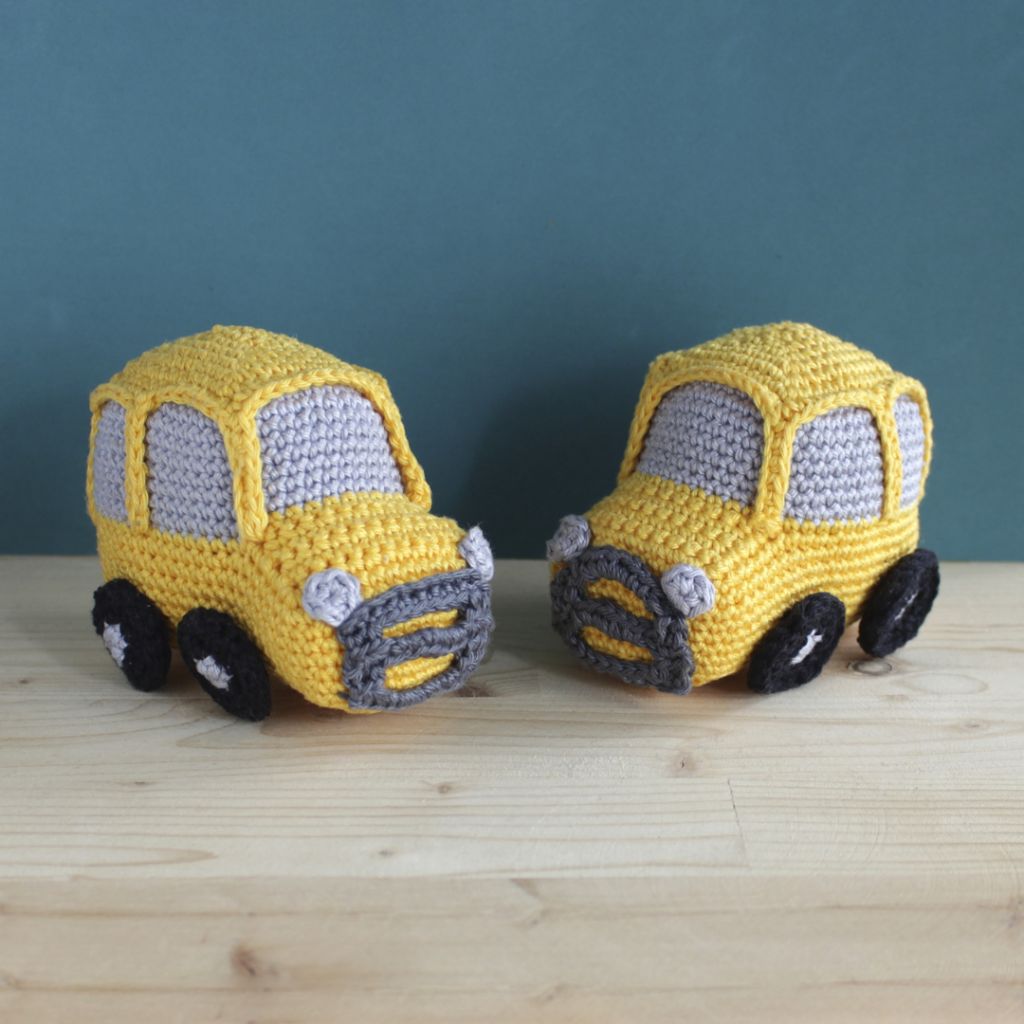
Are you ready for the new school year to start?
Well, this cute little school bus is more than happy to carry your kids on their first day of school and of course, it can provide them with many hours of playtime!
Pattern Information
Materials
Yarn: Fingering weight (50gr/125m) cotton yarn in yellow, gray, dark gray and black.
For my sample I use Scheepjes Catona in the colorways: Yellow Gold (208), Mercury (074), Metal Grey (242) and Jet Black (110)
Crochet Hook: 2.5 mm crochet hook.
Notions: Fiberfill for stuffing, pins, tapestry needle, scissors.
Gauge
28 stitches and 27 rows in single crochet worked in the round, with 2.5 mm crochet hook = 10 cm.
Gauge is not important for this project. However, changes might affect the finished measurements.
Finished Measurements
Approx. 7 cm (2.7 in) tall and 10 cm (4 in) long.
Difficulty
Easy. Basic crochet and sewing skills required.
Abbreviations
This pattern is written in US terminology.
mc: magic circle
ch: chain
sc: single crochet
standing sc: place the slip knot on hook and make the stitch as normal
inc: increase 1 st (2 sc in the same st)
inc2: increase 2 st (3 sc in the same st)
dec: decrease 1 st (single crochet 2 sts together)
dec2: decrease 2 st (single crochet 3 sts together)
hdc: half double crochet
sl st: slip stitch
st(s): stitch(es)
rnds: rounds
{…}: repeat enclosed instructions the amount of times indicated
[…]: the enclosed instructions are worked in the same st
(…): total number of sts of the round and/or additional information
PDF Version Of The Pattern
You can purches the printable PDF version of the pattern in the links below:
Buy the PDF Version in Kouvarakia
Buy the PDF Version in Ravelry
Written Instuctions
Note: Unless otherwise noted, all the individual parts of the pattern are worked in continuous rounds. Use a stitch marker to keep track of your rounds.
For the roof
Use yellow yarn.
Round 1: Ch 5, turn. inc, 2 sc, inc2, continue on the other side of the ch and work 3 sc. (10 sts).
Round 2: {inc2, 4 sc} 2 times. (14 sts).
Round 3: {inc2, 1 sc, inc2, 4 sc} 2 times. (22 sts).
Round 4: 1 sc, inc2, 3 sc, inc2, 6 sc, inc2, 3 sc, inc2, 5 sc. (30 sts).
Round 5: 2 sc, inc2, 5 sc, inc2, 8 sc, inc2, 5 sc, inc2, 6 sc. (38 sts).
Round 6: 3 sc, inc2, 7 sc, inc2, 10 sc, inc2, 7 sc, inc2, 7 sc. (46 sts).
Round 7: 4 sc, inc2, 9 sc, inc2, 12 sc, inc2, 9 sc, inc2, 8 sc. (54 sts).
Round 8: Work this round in the front loops only: 6 sc, [1 sc, ch 7, turn. 6 sc in the ch, 1 sc], 10 sc, [1 sc, ch 7, turn. 6 sc in the ch, 1 sc], 7 sc, [1 sc, ch 7, turn. 6 sc in the ch, 1 sc], 7 sc, [1 sc, ch 7, turn. 6 sc in the ch, 1 sc], 10 sc, [1 sc, ch 7, turn. 6 sc in the ch, 1 sc], 7 sc, [1 sc, ch 7, turn. 6 sc in the ch, 1 sc], 1 sc. (96 sts). Slip stitch in the first st to close the round.
Fasten off and leave a long tail for sewing.
For the windows
Use gray yarn.
Round 1: Work this round in the back loops of Round 7: 1 standing sc in the first st, 53 sc. (54 sts).
Rounds 2-8: 7 rnds. 54 sc. (54 sts).
Round 9: 54 sc, when you reach the end of the round work additional 8 sc. (62 sts).
Change to yellow yarn and continue to hood instructions.
For the hood
Use yellow yarn. The hood is worked in rows.
Row 1: 12 sc. (12 sts).
Rows 2-6: 5 rows. Ch 1, turn. 12 sc. (12 sts). Do not fasten off, continue to the bottom side of the bus.
For the bottom side of the bus.
Continue with the yellow yarn.
Round 1: Ch 1, turn. 11 sc, [4 sc], 5 sc at the side of the hood, 42 sc around the windows, 5 sc at the other side of the hood, inc2 at the corner. (70 sts).
Rounds 2-9: 8 rnds. 70 sc. (70 sts).
Round 10: {dec2, 10 sc, dec2, 19 sc} 2 times. (62 sts).
Round 11: {dec2, 6 sc, dec2, 19 sc} 2 times. (54 sts).
Round 12: {dec2, 2 sc, dec2, 19 sc} 2 times. (46 sts).
Round 13: {2 dec, 19 sc} 2 times. (42 sts).
Round 14: {dec, 19 sc} 2 times. (40 sts).
Fasten off and leave a long tail for sewing.
Stuff the bus with fiberfill.
Use the tail to sew closed the opening. Weave in the ends.
Position the columns and secure them with pins. Use a tapestry needle and yellow yarn to sew them in place.
Grill
Use dark gray yarn. The grill is worked in rows.
Row 1: Ch 11, turn. 10 sc. (10 sts).
Row 2: Ch 2 (count as 1 hdc), turn. 1 hdc in the next st, ch 6, skip 6 sts, 2 hdc. (4 sts, 6 ch).
Row 3: Ch 1, turn. 2 sc, 6 sc in the ch space, 2 sc. (10 sts).
Row 4: Ch 2 (cound as 1 hdc), turn. 1 hdc in the next st, ch 6, skip 6 sts, 2 hdc. (4 sts, 6 ch).
Row 5: Ch 1, turn. 2 sc, 6 sc in the ch space, 2 sc. (10 sts).
Fasten off and leave a long tail for sewing.
Wheels
The wheels have two sides. We will make the back side first and the front side second. Then will attach them together.
For the back side
Use black yarn. Make four.
Round 1: In mc work 6 sc. Sl st in the first st to close the round. (6 sts).
Round 2: Ch 1, skip the sl st, 6 inc. Sl st in the first st to close the round. (12 sts).
Round 3: Ch 1, skip the sl st, {1 sc, inc} 6 times. Sl st in the first st to close the round. (18 sts).
Fasten off and weave in the ends.
For the front side
Use gray and black yarn. Make four.
Start with gray yarn.
Round 1: In mc work 6 sc. Sl st in the first st to close the round. (6 sts).
Change to black yarn.
Round 2: Ch 1, skip the sl st, 6 inc. Sl st in the first st to close the round. (12 sts).
Round 3: Ch 1, skip the sl st, {1 sc, inc} 6 times. Sl st in the first st to close the round. (18 sts).
Do not fasten off, continue with the joining instruction.
For the joining
Place the frond side of the wheel on top of the back side (wrong sides together) and work 18 sl sts around, inserting the hook on both sides at the same time.
Fasten off and leave a long tail for sewing.
Lights
Use gray yarn. Make two.
Round 1: In mc work 6 sc. Sl st in the first st to close the round. (6 sts).
Fasten off and leave a long tail for sewing.
Assembly
• Sew the grill on the front of the bus.
• Sew the lights on the top sides of the grill.
• Sew the wheels on the sides of the bus.
• Weave in any remaining ends.
Video Tutorial
Have you made this pattern? Share a photo on Instagram and don’t forget to use #kouvarakia or tag me @kouvarakia so I can see your work.