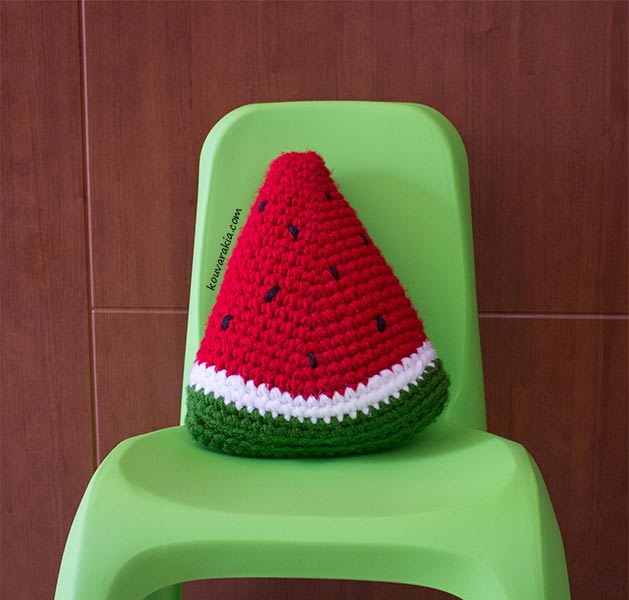
This time of the year, watermelons are the fruit of honour and they can be found in stranger situations than just the grocery stands, clothes, accessories, posters and all sorts of decorations. These decors were of particular interest to me, a chance to put a bit of summer in our house, vacations being a bit far still. So with a quick look in my stash, I found just enough yarn in the shades I needed to crochet a small pillow the shape of a watermelon slice. If you like watermelons too, here’s my pattern so you can make one of your own.
You will need bulky yarn in white, red, green and black, a 6 mm crochet hook, a tapestry needle and pillow stuffing. Because I wanτed to create a “stiff” fabric I was holding two strands of yarn together.
Specifically for a 25 cm high and 20 cm wide pillow, I used a whole skein (120 m ~ 100 gr) for the red colour, approximately 8.5 m for white, 20 m for green and 1.50 m for the black. My gauge is 10 rows and 11 stitches for 10 cm.
Work the pillow top – down in continuous rounds. The base crochets seperatly and then it’s sew to the pillow.

Abbreviations:
ch: chain
sc: single crochet
slst: slip stitch
st(s): stitch(es)

For the watermelon:
With red yarn. Ch 5. Use a stitch marker to keep track off your rounds
Round 1: Work 1 sc in the second ch from hook and 1 sc in each of the next 2 sts, work 3 sc in the last st of the ch, turn and work on the opposite side of the chain. Work 1 sc in the next 2 st and 2 sc in next st. (10 sts)
Round 2: *Work 1 sc in the next 4 sts and 2 sc in the next st*. Repeat from * to * 1 more time (12 sts)
Round 3: Work 1 sc in next 4 sts and 2 sc in next st. Work 1 sc in next 5 sts and 2 in next st. Work 1 sc in next st. (14 sts)
Round 4: Work 1 sc in next 5 sts and 2 sc in next st. Work 1 sc in next 6 sts and 2 sc in next st. Work 1 sc in next st. (16 sts)
Round 5: Work 1 sc in next 5 sts and 2 sc in next st. Work 1 sc in next 7 sts and 2 sc in next st. Work 1 sc in next 2 sts. (18 sts)
Round 6: Work 1 sc in next 6 sts and 2 sc in next st. Work 1 sc in next 8 sts and 2 sc in next st. Work 1 sc in next 2 sts. (20 sts)
Round 7: Work 1 sc in next 6 sts and 2 sc in next st. Work 1 sc in next 9 sts and 2 sc in next st. Work 1 sc in next 3 sts. (22 sts)
Round 8: Work 1 sc in next 7 sts and 2 sc in next st. Work 1 sc in next 10 sts and 2 sc in next st. Work 1 sc in next 3 sts. (24 sts)
Round 9: Work 1 sc in next 7 sts and 2 sc in next st. Work 1 sc in next 11 sts and 2 sc in next st. Work 1 sc in next 4 sts. (26 sts)
Round 10: Work 1 sc in next 8 sts and 2 sc in next st. Work 1 sc in next 12 sts and 2 sc in next st. Work 1 sc in next 4 sts. (28 sts)
Round 11: Work 1 sc in next 8 sts and 2 sc in next st. Work 1 sc in next 13 sts and 2 sc in next st. Work 1 sc in next 5 sts. (30 sts)
Round 12: Work 1 sc in next 9 sts and 2 sc in next st. Work 1 sc in next 14 sts and 2 sc in next st. Work 1 sc in next 5 sts. (32 sts)
Round 13: Work 1 sc in next 9 sts and 2 sc in next st. Work 1 sc in next 15 sts and 2 sc in next st. Work 1 sc in next 6 sts. (34 sts)
Round 14: Work 1 sc in next 10 sts and 2 sc in next st. Work 1 sc in next 16 sts and 2 sc in next st. Work 1 sc in next 6 sts. (36 sts)
Round 15: Work 1 sc in next 10 sts and 2 sc in next st. Work 1 sc in next 17 sts and 2 sc in next st. Work 1 sc in next 7 sts. (38 sts)
Round 16: Work 1 sc in next 11 sts and 2 sc in next st. Work 1 sc in next 18 sts and 2 sc in next st. Work 1 sc in next 7 sts. (40 sts)
Round 17: Work 1 sc in next 11 sts and 2 sc in next st. Work 1 sc in next 19 sts and 2 sc in next st. Work 1 sc in next 8 sts. (42 sts)
Round 18: Work 1 sc in next 12 sts and 2 sc in next st. Work 1 sc in next 20 sts and 2 sc in next st. Work 1 sc in next 8 sts. (44 sts)
Round 19: Work 1 sc in next 12 sts and 2 sc in next st. Work 1 sc in next 21 sts and 2 sc in next st. Work 1 sc in next 9 sts. (46 sts)
Round 20: Work 1 sc in next 13 sts and 2 sc in next st. Work 1 sc in next 22 sts and 2 sc in next st. Work 1 sc in next 9 sts. Skip 1 st and slst in next. Fasten of. (18 sts)
Round 21: With white yarn. Attach new yarn in the next st from the slst and work 1 ch (cound as a sc).Work 1 sc in next 7 sts and 2 sc in next st. Work 1 sc in next 10 sts and 2 sc in next. Work 1 sc in next 12 sts and 2 sc in next. Work 1 sc in next 10 sts and 2 sc in next. Work 1 sc in next 4 sts. Slst in first ch to close the round. (52 sts)
Round 22: Ch1. Work 1 sc in each st. Slst to close the round. Fasten off. (52 sts)
Round 23: With green yarn. Attach new yarn in any st of previous round and work 1 sc in each st. Slst in first st to close the round. Ch1. (52 sts)
Round 24: Work 1 sc in each st. Slst in first st. Fasten off. (52 sts)
Use the black yarn to embroider the seeds.

For the base:
With green yarn, ch 23
Row 1: Work 1 sc in each st. Ch 1, turn (22 sts)
Row 2 – 4: Repeat row 1. In row 4 don’t ch 1. Fasten off.

Assembly:
Fold the watermelon as seen in picture. Sew the base on pillow (sew the midle of the base at the corner, as in the picture) and don’t forget to stuf it before closing.
For the small watermelon (12 cm high and 10 cm width) I followed the same pattern but I used a 4 mm crochet hook and light worsted yarn.
