Hello everyone!
I thought Ι would come back to the blog with a tutorial about how to make the Half Double Crochet in the third loop (HDC3RDL). This stitch, that is also known as the camel stitch, is easy to make and creates a nice ribbing texture.
As you may already guess it’s just a Half Double Crochet worked in a different loop, so lets find out where that loop is.
In the photo above I made a row of HDC. You can see the front and the back loops of the HDC, where we normally work the next row. Now if you stretch the stitches a little bit you will find a “bar” between them. That’s the yarn over of the HDC and it’s also the THIRD LOOP that we are looking for.
It’s a little tricky to see it from the right side of the HDC but it is more obvious on the wrong side.
When we work in that loop we push the front and back loops (the top V) forward and that creates the ribbing texture.
You can work the 3LHDC in the round or in rows.
HDC3RDL worked in the round
When you are working in the round you face the right side of your work. So, in order to push the top “V” forward, you need to insert the hook in the third loop from the back side of your stitch.
Make a chain as long as your pattern requires and join in round with a slip stitch in the first stitch.
Round 1: Ch 1 and work 1 hdc in each stitch of the round. Work in continuous rounds, use a stitch marker to keep track of your rounds.
Round 2: Yarn over, insert your hook in the 3rd loop from the back side of your stitch and finish the hdc as normal, repeat around.
Work as many rounds as your pattern requires.
This method produces a fabric with a ribbing texture on the right side and a flat wrong side.
HDC3RDL worked in rows
When you are working in rows you face both sides of your work. That allows to reach the 3rd loop either from the same side or from both sides of your work.
HDC3RDL worked in rows, reaching the loop from the same side of the work:
First you need to decide at which side of your work you will insert your hook for your 3rd loop (front or back) and keep inserting it from that side for all the rows. For this example I insert the loop from the front side of the work.
Make a chain in your desired length.

Row 1: (Right side). Work a hdc in the second chain from hook and in each stitch of your chain. Ch 1, turn.
Row 2: (Wrong side). Yarn over, insert the hook in the 3rd loop from the front side of the work, yarn over and finish the hdc. Repeat in every stitch of the row. Ch 1, turn.
Row 3: (Right side). Repeat row 2 .
Repeat Row 2 as many times as you need.
As you can see this method makes a fabric with similar ribbing texture on both sides.
HDC3RDL worked in rows from both sides of the work:
This time when you face the right side of the work, you will insert your hook in the 3rd loop from the back side, and when you face the wrong side of your work, you insert in the 3rd loop from the front.
Make a chain in your desired length.
Row 1: (Right side). Work a hdc in the second chain from hook and in each stitch of your chain. Ch 1, turn.
Row 2: (Wrong side). Yarn over, insert the hook in the 3rd loop from the front side, yarn over and finish the hdc. Repeat in every stitch of the row. Ch 1, turn.
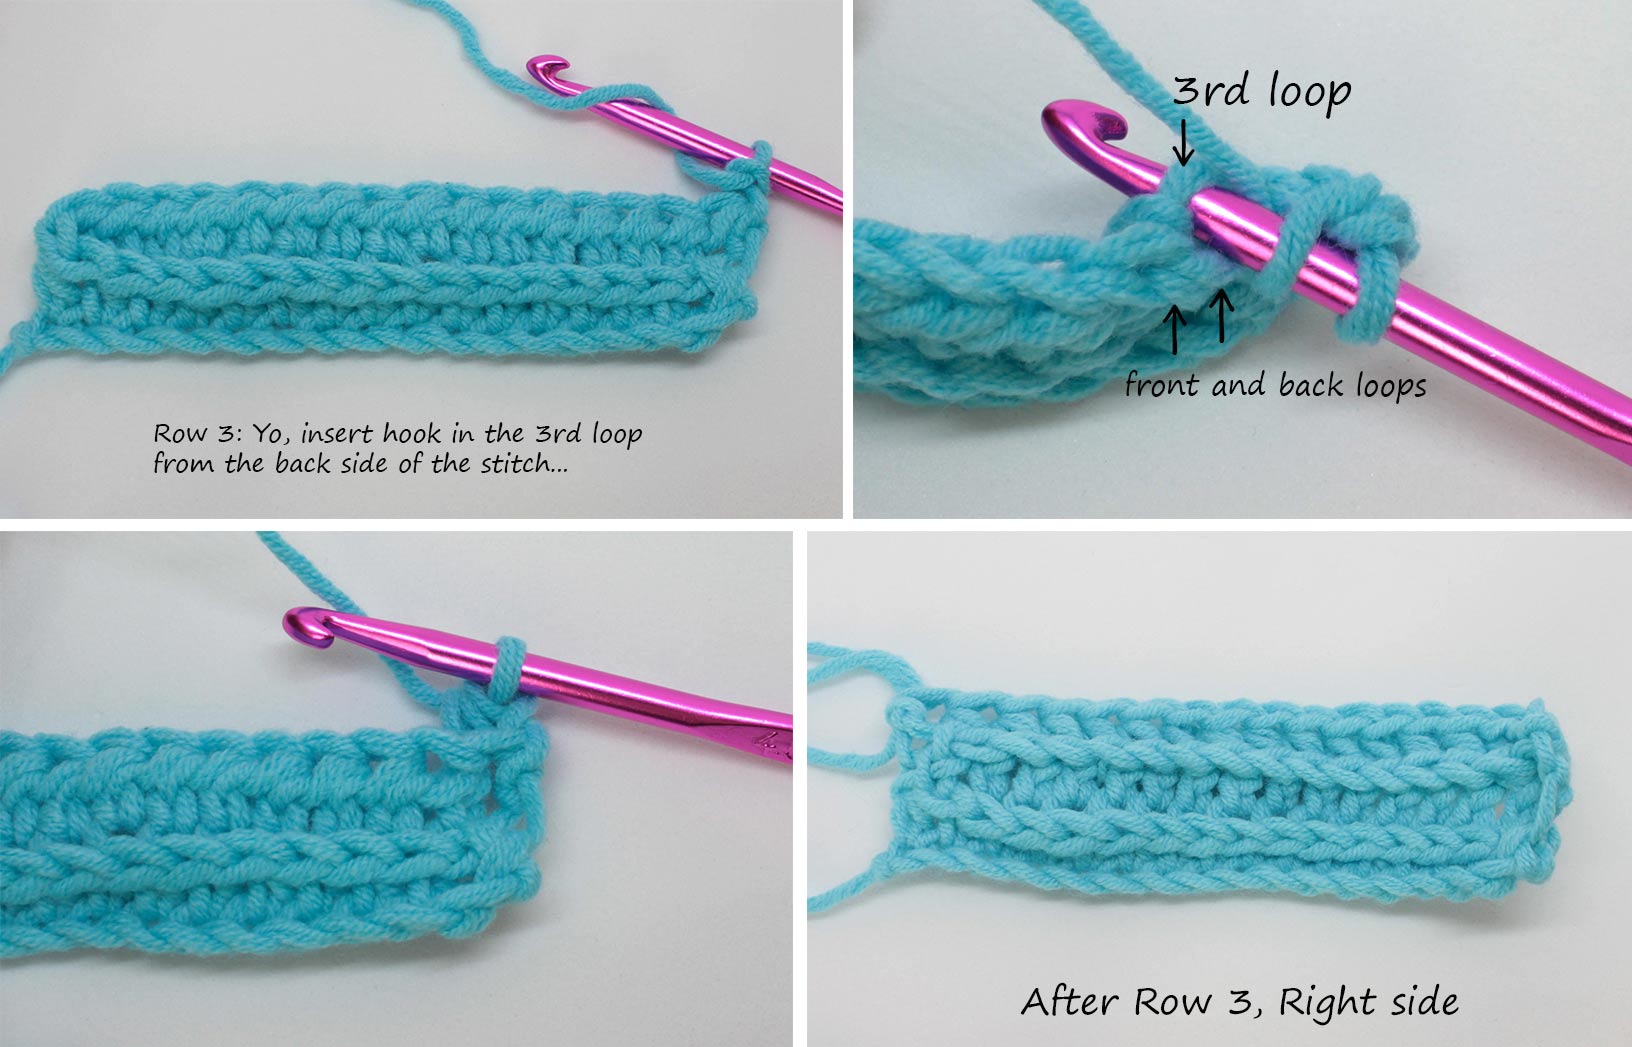
Row 3: (Right side). Yarn over, insert the hook in the 3rd loop from the back side, yarn over and finish the hdc as usual. Repeat in every stitch of the row. Ch 1, turn.
Repeat rows 2 and 3 as many times as you need.
With this method the fabric looks almost like it was worked in the round, with the only difference being that the “V”s are changing direction in each row.
[youtube https://www.youtube.com/watch?v=8ziIVZsJUP0&w=560&h=315]
I hope you enjoyed this tutorial


