First we select the materials. In order to make a beanie we can use any yarn and the equivalent crochet hook size. If you’re a beginer I recommend a medium weight yarn and 4 or 5 mm crochet hook.
Next we determine the size we want for the hat. In order to do that we need the height and the circumference of the head. For the height use a mesuare tape from the top of the head to the base of the ear. For the circumference use a measure tape around the head, just above the eyebrows.
After we measure the circumference, we can find the diameter of the head by dividing the circumference with π (3,14). For instance, if the head has a circumference of 54 cm, the diameter would be: 54/3,14=17.19 cm (rounded down to 17 cm). Due to the elasticity of the beanie we reduce the diameter by 1 cm, rounding it down to 16 cm.
If we can’t measure the head, then we can use the growth charts of WHO. I have made a table with the average size. Of course we need to take into account the specific child’s growth in relation to it’s age.

We now have the materials and dimensions for the hat. On to the practical part.
To make a hat, we work top-down in circles, increasing the stitches in every round, until we form a flat circle in the heads diameter. To do that, we start with 4 chains and join to form a ring. Alternately, we could start with a magic ring.

Round 1: Work your first round stitches in the ring. The number of stitches you need depends on the type of your stitches. Usually for the first round we need 5 – 8 stitches when we work single crochet, 8 – 12 for half double crochet and 10 – 15 for double crochet. The first stitch on every round starts with chains. More specifically, if we work with single crochet, we start with one chain and a single crochet. If we work with half double crochet, we start with two chains. If we work with double crochet, we start with three chains. Join the rounds with slip-stitch on the first stitch.
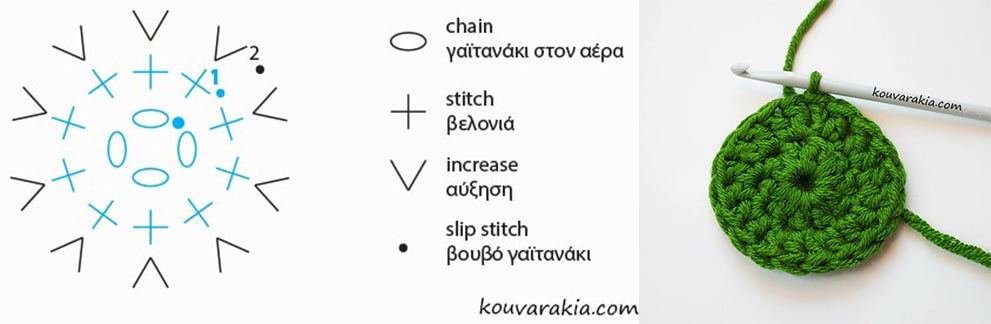
Round 2: Work 2 stitches in every stitch of the previous round.

Round 3: Work 1 stitch in the first stitch, work 2 stitches in the next stitch. Repeat until the end of the round.
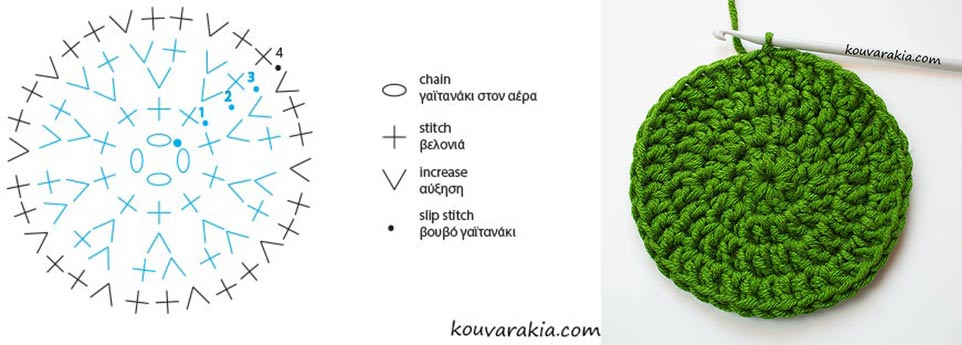
Round 4: Work 1 stitch into the next 2 stitches, work 2 stitches in the next stitch. Repeat until the end of the round.
Round 5: Work 1 stitch into the next 3 stitches, work 2 stitches in the next stitch. Repeat until the end of the round.

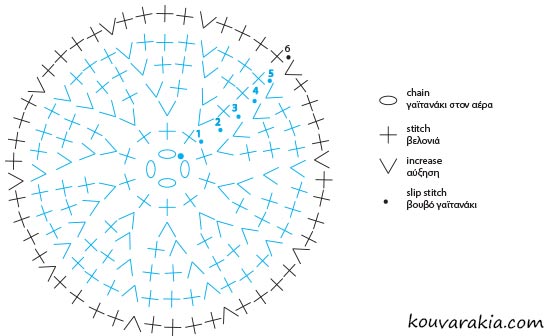
Round 6: Work 1 stitch into the next 4 stitches, work 2 stitches in the next stitch. Repeat until the end of the round.
Continue adding a stitch before the increases until you reach the diameter. Depending on the size of the hat and the weight of the yarn you might need more or less rounds compared to the example.

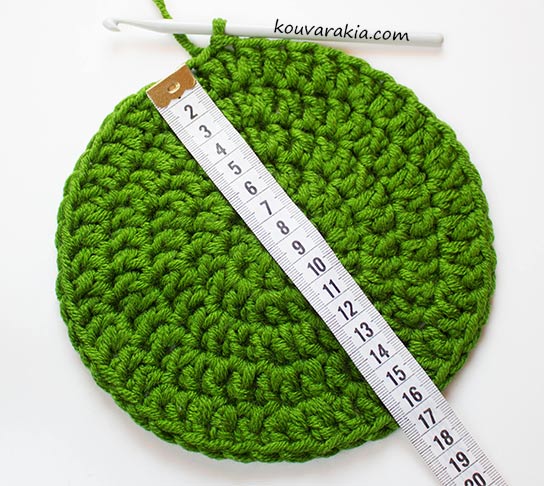
When we reach the desired diameter, we stop increasing the stitches, going on with constant numbers untill we reach the desired height.
And we’re done! We can add assorted embelishment & decoration, like flowers, buttons, etc.